mercredi 14 décembre 2016

10 Proven Tips To Lose Weight For Good

10 Proven Tips To Lose Weight For Good
 Sara Patton, High School Chemistry Teacher, lost 22 pounds in 2 months

1. It’s not about weighing how much you eat

“Put away the food scale. Portion control isn’t about measuring; it’s about ordering two appetizers instead of an entrée and cutting back on bread if you have pasta.”
– Sally McGuiness, Homemaker, lost 36 pounds in 5 months

2. Keep a stash of fruit handy

“Keep fruit at work. It helps during the I-need-chocolate part of the afternoon.”
– Jill McRae, Receptionist, lost 28 pounds in 8 months

3. Protein shakes

“When I’m trying to drop a few pounds, I carry around a shaker cup of chocolate protein powder. If I’m ravenous, I add the water, and it fills me up so I don’t eat something high-calorie instead.”
– Paula Lee, Real Estate Broker, lost 43 pounds in 12 months

4. Set realistic limitations

“In the cafeteria I use a 4-by-4-inch Styrofoam box, and I put whatever I want in there. It’s almost impossible to overeat.”

5. Brush your teeth right after dinner

“Brushing my teeth after dinner makes me less likely to eat again before I go to bed.”
Christine Polk, Homemaker, lost 24 pounds in 4 months

6. Take a before photo

“Before I got in shape, a friend convinced me to take photos of myself wearing nothing but a sports bra and underwear. Anytime I fall off the wagon I look at those pics—that’s all the motivation I need!”
– Hattie Quinlan, Zoo Keeper, lost 26 pounds in 4 months

7. Cut out all liquid calories

“Cut out drinks with calories—juice, lemonade, and, hardest of all, after-work wine.”
– Amanda Lupin, Banker, lost 40 pounds in 10 months

8. Wear something tight

“Wear something form fitting! It provides the extra bit of motivation to lay off the fries.”
– Kayla Manzani, Retail Assistant, lost 21 pounds in 3 months

9. Can’t go wrong with cucumbers

“Fill a pitcher with water and cucumbers. It’s pretty—and it feels like a treat.”
Lisa Mancini, Programmer, lost 29 pounds in 5 months

10. Pack leftovers before you eat

“Serve yourself, then immediately pack the leftovers in a Tupperware container and store in the fridge.”
– Sam Guardia, lost 39 pounds in 18 weeks

mardi 19 avril 2016

Provençal Salmon

In 1998, Mark Bittman and Katy Sparks, then chef of Quilty's in Manhattan, developed this easy recipe for salmon encrusted with fennel seeds, rosemary and orange zest. It's a simple though sophisticated twist on weeknight salmon.
A couple things to keep in mind when making this dish: Make sure you use fillets of equal size. Buy skinned salmon fillet from the thick (that is, not the tail) end of the fish then cut across the fillet to make the four pieces. Also, allow the fish to sit for a while after coating to encourage the fragrant seasonings to permeate the flesh of the fish.
Featured in: The Minimalist; A Straightforward Technique Leading To Splendid Salmon
Provençal Salmon,
Provençal Salmon,

INGREDIENTS

4 6-ounce, skinned salmon fillets
Salt and freshly ground black pepper to taste
1 tablespoon fennel seed
1 tablespoon minced freshrosemary
1 tablespoon minced orange zest
2 tablespoons olive oil or clarified butter

PREPARATION

Step 1

Season fillets on both sides with salt and pepper. Grind fennel seed coarsely in a coffee or spice grinder, and mix it with the rosemary and orange zest. Press this mixture onto the top of each fillet.
Preheat oven to 400 degrees.

Step 2

Preheat a large nonstick skillet over medium-high heat for 3 or 4 minutes. Add the oil or butter called for in the recipe and, when it shimmers, place the fillets, coated side down, in the pan. Cook about 1 minute, or until the spice mixture forms a nicely browned crust.

Step 3

Turn the fillets and cook about a minute more, then transfer to the oven. Cook about 4 minutes for rare salmon, 5 to 6 minutes for medium rare and 8 minutes for well done.

Simplest Roast Chicken

With an ingredient list just four items long (chicken, olive oil, salt, pepper), the genius of this bare-bones roast chicken is in its technique. To make it, thoroughly preheat a cast-iron skillet before sliding into it a seasoned bird, breast side up. In under an hour you’ll get a stunner of a chicken, with moist, tender white meat, crisp, salty chicken skin, and juicy dark meat all done to a turn. If you don’t already have a cast-iron skillet large enough to hold a whole chicken, this recipe is a good enough reason to invest in one.
Featured in: Simplest Roast Chicken
Simplest Roast Chicken

INGREDIENTS

  • 1 whole chicken, 3 to 4 pounds, trimmed of excess fat
  • 3 tablespoons extra-virgin olive oil
  •  Salt and freshly ground black pepper

  • PREPARATION

Step 1

Put a cast-iron skillet on a low rack in the oven and heat the oven to 500 degrees. Rub the chicken all over with the oil and sprinkle it generously with salt and pepper.

    Step 2

    When the oven and skillet are hot, carefully put the chicken in the skillet, breast side up. Roast for 15 minutes, then turn the oven temperature down to 350 degrees. Continue to roast until the bird is golden brown and an instant-read thermometer inserted into the meaty part of the thigh reads 155 to 165 degrees.

    Step 3

    Tip the pan to let the juices flow from the chicken’s cavity into the pan. Transfer the chicken to a platter and let it rest for at least 5 minutes. Carve and serve.

Rainbow Quinoa Salad

Dr. David Eisenberg of the Harvard School of Public Health demonstrated along with his daughter, Naomi, a whole- wheat couscous salad that is the inspiration for this one at the “Healthy Kitchens, Healthy Lives” medical education conference in Napa Valley this year. You can use a variety of dried fruits and nuts, as well as a mix of herbs. Chop the larger dried fruits small so that the pieces are uniform.
Featured in: Rainbow Quinoa Salad
Rainbow Quinoa Salad

INGREDIENTS

FOR THE SALAD:

  • 4 cups water
  •  cup chopped dried fruit (such as apricots, raisins, cranberries, figs, currants)
  • ¼ cup chopped cilantro
  • ¼ cup chopped fresh mint
  • ½ cup chopped fresh parsley
  •  Salt to taste
  • 1 cup red quinoa or rainbow quinoa, rinsed
  • ¼ cup lightly toasted pistachios
  • ¼ cup lightly toasted almonds, chopped
  • ¼ cup chopped walnuts
  • 2 teaspoons lemon zest

FOR THE DRESSING:

  • ¼ cup fresh lemon juice
  •  Salt to taste
  • 1 small garlic clove, puréeed (optional)
  • ¼ teaspoon ground cinnamon
  • 1 teaspoon pomegranate molasses
  •  cup extra- virgin olive oil

  • PREPARATION

Step 1

    Bring water to a boil in a 3-quart saucepan and add quinoa and salt to taste. Bring back to a rolling boil, then reduce heat slightly and boil gently for 20 minutes, or until you see a thread emerge from the blond and red quinoa. Drain and shake well in the strainer, then return to pot. Cover pot with a dishtowel and then , then place a lid over the dishtowel and let sit for 10 to 15 minutes undisturbed. Transfer to a large bowl.

    Step 2

    Meanwhile, whisk together lemon juice, salt, garlic, cinnamon, and pomegranate molasses. Whisk in olive oil.

    Step 3

    Toss together quinoa and dressing. Add remaining ingredients and toss together. Transfer to a platter, a wide bowl or individual plates and serve.

jeudi 14 janvier 2016

Pickled Peach Grilled Cheese with Virginia Ham

Grilled Cheese and Fruit,
Pickled Peach Grilled Cheese with Virginia Ham
These little slider grilled cheese sandwiches are packed with flavor and they make the perfect bite-size appetizers and party snack. Filled with a dollop of woodsy mulberry jam, some salty slices of Virginia ham, a couple of bright pickled peach segments, and nutty shreds of gouda and then grilled between two buttery sweet slices of Hawaiian bread, this sandwich packs quite the flavorful punch.
And the best part is that this sandwich is good all year round - whether you're making it in the middle of summer when peaches are perfectly in season or whether you're making it in the dead of winter, after your peaches have been pickling for a few months. 
To see more about this recipe and to view step-by-step photographs from Grilled Cheese Social, click [HERE].
INGREDIENTS
  • 2 small slices of gouda
  • 1/2 tbsp mulberry jam
  • 2 slices of Virginia Ham
  • 2 slices of pickled peaches
  • 1 Hawaiian Roll
  • 2 pats of salted butter
  • ** I always recommend using local or organic ingredients because hey, let's be real - they just taste better! **
  • PREPARATION
    1. Gently cut 1 Hawaiian roll in half and use the interior of the roll as the new exterior of this grilled cheese sandwich. Smear some mulberry jam onto 1 side of the roll (I source this from Underground Butcher in Wisconsin) and then gently pile on the ham, the pickled peaches, the remaining cheese, and the other half of the Hawaiian roll. Butter both sides of the sandwich and set aside.

    2. Turn a burner to medium and gently place sandwich insi

    Let cook for a few minutes on each side until the cheese has melted and the bread has crisped up and become golden. When it's perfectly grilled on each side, take it off the heat and set aside to let it cool for a minute and then serve

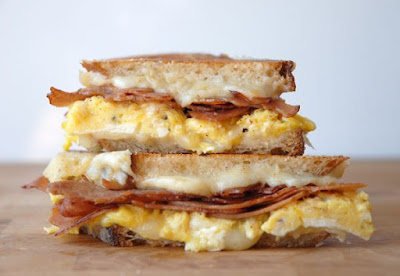
Southern Breakfast Grilled Cheese

Southern Breakfast Grilled Cheese
Southern breakfast grilled cheese, ham, fenugreek gouda, scrambled eggs, sourdough

This Southern breakfast grilled cheese is packed with sweet and salty flavors. Fenugreek gouda, which is studded with fenugreek seeds (typically used to mimic maple flavoring in generic store-bought syrups), melts like a charm and works perfectly for this breakfast sandwich. The soft scrambled eggs create an airy texture while the maple glazed ham and sourdough balance out the sweetness of this sandwich. It's one breakfast grilled cheese that will have you coming back for more.

To see more step-by-step pictures of this sandwich click HERE.

INGREDIENTS 

4 slices of regular deli style ham
1 tsp maple syrup
1 egg
1 tbsp hot sauce
1 splash milk
1 pinch salt
3 ounces Fenugreek Gouda
2 slices sourdough
3 pats of salted butter

Prep Time: 10 minutes
Cook Time: 7 minutes

Total Time: 17 minutes
Yield: 1 sandwich

PREPARATION

1. To begin, roughly chop your ham and set aside. In a cast iron skillet, over high heat add the ham and cook until it starts to brown. When it begins to caramelize, pour the maple syrup in and stir. Cook over low heat until the syrup is cooked into the ham. Remove from heat and set aside.

2. Crack your egg in a small bowl and add hot sauce, milk, and a pinch of salt. Whisk until combined. In a non-stick pan, add 1 pat of butter and cook eggs, stirring consistently, until they are soft yet opaque.
Remove from heat and set aside.

3. Assemble the sandwich, Layer one piece of sourdough with half the fenugreek gouda, then add the scrambled eggs, the ham, the remaining cheese and the other slice of sourdough. Butter both sides of your sandwich. Turn the heat source to medium, and place sandwich inside the skillet. Cook for a few minutes on each side until the sandwich is golden brown and the cheese has melted. Remove from heat and let sit for a few minutes - this not only allows the cheese to coagulate so that it doesn't ooze out of the sandwich but it also allows the flavors to intensify - thus providing a tastier, more solid sandwich.

4. Enjoy and don't forget to share with friends!

** I recommend buying local and using organic ingredients - they just taste better and they're better for the world and yourself!**

dimanche 10 janvier 2016

Pork Salad

Pork Salad

Pork Salad

Ingredients

  • 3/4 Pound Pork Shoulder
  • 1/2 cup red wine
  • 1 tablespoon kosher salt
  • 1 teaspoon curing salt
  • 1 red bell pepper
  • 1 yellow bell pepper
  • 1 head lettuce
  • A few cherry tomatoes
  • Sliced Fodder radish
  • Nutmeg grated on the pork
  • 1/2 head broccoli head steamed
  • 1 tablespoon white seseame seeds
  • Szchuan chilli flakes

Method

  1. First cure the pork; Rub it with the curing salt, kosher salt, nutmeg and chilli flakes. Pour in the wine and rub everything on the meat.Wrap it nicely in cling film paper and refrigerate for at least a week.
  2. Once cured, you can take it and place it on an oven baking tray. Rub it with some sesame oil and bake at 350 degrees F/ 170 degrees C for 45 minutes. Half way take it out and coat it well with sesame seeds and extra chilli flakes if needed.
  3. Once roasted, thinnly slice it and place it on your salad. Amazing!
  4. For the sald body, chop the lettuce, bell peppers, radish, broccoli and tomatoes. You can add in any other veggies you want.
  5. Perfect with a light vinaigrette of your choice

Additional Info

The salad doen't need any seasoning as the pork will be salty and spiced. Also if you will use vinaigratte the flavors will all come together

vendredi 8 janvier 2016

Seafood Bastilla Recipe with Shrimp, Calamari and Fish

Seafood Bastilla Recipe with Shrimp, Calamari and Fish

Seafood Bastilla Recipe with Shrimp, Calamari and Fish

INGREDIENTS
  • ----- Seafood -----
  • 1 kg (2 lbs.) fresh medium shrimp, shelled, cleaned and tails removed
  • 1/2 kg (1 lb.) fresh calamari, cleaned and cut into 1/4" rings, tentacles chopped
  • 1/2 kg (1 lb.) fresh swordfish (or other firm, low-fat fish)
  • 3 tablespoons butter, divided
  • salt and pepper
  • ----- Tomato Sauce -----
  • 2 large ripe tomatoes, seeded and grated
  • 2 large cloves garlic, pressed or finely chopped
  • 1 large handful fresh parsley, finely chopped
  • 2 tablespoons vegetable oil
  • 1 teaspoon salt
  • 1 teaspoon pepper
  • ----- Vermicelli Filling -----
  • 1 handful dry black mushrooms
  • 175 g (6 oz.) dry Chinese vermicelli
  • 1 tablespoon hot sauce, or to taste
  • 1 tablespoon soy sauce
  • tomato sauce
  • reserved liquids from cooking the seafood
  • ----- Assembly -----
  • 1/2 kg (1 lb.) warqa or phyllo dough
  • 1/2 cup butter, melted
  • 1 tablespoon vegetable oil
  • 1 egg yolk, beaten
  • 1 cup grated cheese (Edam, Mild Cheddar, Gouda, etc.)
  • ----- Garnish -----
  • 1/4 to 1/2 cup grated cheese (optional)
  • cooked shrimp (optional)
  • lemon slices (optional)
  • parsley (optional)


PREPARATION

Make the Tomato Sauce

In a small pot or pan, mix the grated tomatoes, garlic, salt, pepper and vegetable oil. Simmer over medium-low heat, uncovered, for 15 to 20 minutes, stirring occasionally. Add the parsley, remove from the heat, and set aside.

Cook the Shrimp

Melt 1 tablespoon butter in a large non-stick skillet. Add shrimp and 1/2 teaspoon each of salt and pepper. Sauté over medium-high for one or two minutes, until the shrimp turns white but the center is still slightly clear.

Melt 1 tablespoon butter in the skillet. Add the swordfish and 1/2 teaspoon each of salt and pepper. Cook over medium heat, turning several times, until the fish flakes easily.
Drain the shrimp, reserving the liquid, and set aside. (If desired, you can reserve several shrimp for garnishing the baked bastilla at serving time.)

Cook the Swordfish

Transfer the fish to a plate and reserve the liquid. Pick the fish off the bones, breaking it into bite-size pieces, and set aside.

Cook the Calamari

Melt 1 tablespoon butter in the skillet. Add the calamari and 1/2 teaspoon each of salt and pepper. Cover and simmer one hour over medium-low heat, or until very tender.
Drain the calamari, reserving the liquid, and set aside.

Prepare the Mushrooms

Soak the dry mushrooms in water for 30 minutes. Drain, chop the mushrooms coarsely and set aside.

Cook the Chinese Vermicelli

Soak the vermicelli in water for 15 to 20 minutes. Drain and chop into pieces about 2” to 3” long. Place the vermicelli in a pot with the reserved liquids from the seafood.
Stir in the soy sauce, hot sauce and the tomato sauce.
Cook uncovered over medium-low heat, stirring occasionally, until the vermicelli is tender and the liquids are mostly absorbed, about 10 minutes. Remove from the heat.

Combine the Filling

Place the cooked shrimp, calamari, fish, mushrooms, and vermicelli into a very large bowl and mix well. Taste the filling – it should be a bit salty and spicy. If desired, adjust the seasoning with additional soy sauce and hot sauce.

Assemble the Bastilla

The bastilla will be assembled in this order:
  • bottom layer of warqa or phyllo
  • seafood filling
  • grated cheese
  • top layer of warqa or phyllo
Keep your warqa or phyllo covered with plastic wrap while working, and brush each piece of dough with butter as you work with it.
It's easiest to assemble bastilla if you work inside a 14” or larger round pan, but you can work on a flat surface if necessary.
Brush melted butter, then vegetable oil, on the bottom of your pan or your work surface.
Overlap single layers of warqa (shiny side down) or double layers of phyllo, to cover the bottom of the pan. Allow several inches of excess dough to drape over the sides of the pan, as shown in this photo. Remember to brush butter on each piece of dough.
Add a 12” circle of warqa (shiny side down) or two 12” circles of phyllo. This serves as the base of your pie. Butter the dough.
Distribute the filling over the base, lightly pressing and molding to maintain the circular shape. Dribble 2 tablespoons of the melted butter over the filling, and top with the grated cheese.
Fold the loose edges of the dough up around the filling to fully enclose the pie. Try to maintain a circular shape, and trim off any excess dough that can’t be folded neatly. Brush the tops and sides of the pie with butter.
Top the pie with two or three overlapping layers of warqa (shiny side up), or four or five overlapping layers of phyllo, to form a smooth top. (Remember to butter each piece of dough.) Fold the edges of the dough snugly down around the edge of the pie, tucking the excess under the pie and gently molding a rounded edge.
Brush the entire top and sides of the bastilla first with butter, then with the beaten egg yolk.
(Note: If you want to shape individual pies, use one or two small buttered rounds of warqa pastry, shiny side down, Place some grated cheese on the pastry, add a generous dollop of filling, then fold the edges over the filling as neatly as possible, trimming the excess dough after you shape and enclose the pie. Turn the pie over and bake with the smooth side on top. )
The bastilla is now ready for baking. The unbaked bastilla may be wrapped in plastic and refrigerated (one day) or frozen (up to two months).

Bake and Serve

Preheat oven to 350° F (180° C).
Place the bastilla on a buttered baking sheet – a pan with no sides allows for easy transfer to a serving plate – and bake until crisp and golden brown, about 30 to 45 minutes. A bastilla taken from the freezer may take longer.
If desired, garnish the bastilla by sprinkling grated cheese on it and returning the pie to the oven to allow the cheese to melt and brown slightly. Transfer the bastilla to a large platter for serving. If desired, you can further garnish the bastilla with a few cooked shrimp, twisted lemon slices and a little fresh parsley. 

dimanche 15 novembre 2015

TINGKAT DINNER DELIVERY FROM HONG CHOO CATERING


TINGKAT DINNER DELIVERY FROM HONG CHOO CATERING

After Kim’s Kitchen trial tingkat (posts 1,2,3), we decided to try another caterer. Hong Choo Catering was recommended by sis-in-law, who said that (compared to Kim’s Kitchen) the food is more child-friendly for her 7-year-old daughter.

We’re now into our 3rd month of tingkat dinner with Hong Choo. Of course, it still can’t beat our own home cooking. But compared to Kim’s Kitchen, we prefer Hong Choo’s cooking.

The food tastes light but flavorful, and isn’t greasy. We don’t feel thirsty after eating, which is a sign of no MSG or very little use of it. The dishes are quite similar to our family’s recipes too.

Here are 8 meals, taken randomly over the past 3 weeks or so.


Breaded fish fillets
Stir-fried baby kailan
Braised chicken & mushroom
Scrambled eggs with corn, peas & carrot

TINGKAT DINNER DELIVERY FROM HONG CHOO CATERING

Fried mini spring rolls
Broccoli with carrot & mushroom
Celery with prawn
Stewed pork rib


Stir-fried pork with leek
Ngoh hiang (5-spice meat roll)
Fried fish with some kind of dark soy gravy
Stir-fried cabbage
hong-choo-02


Fried samosas
Stir-fried Chinese cabbage
Fish fillets with Thai-style chilli sauce
Steamed minced pork patty
hong-choo-04


Stir-fried beansprout with tau kwa
Stewed potato
Stewed chicken
Fried fish
hong-choo-05


Stewed duck
Stir-fried long bean
Pork slices with garlic sprout
Beancurd sheets in soy gravy
hong-choo-06


Stir-fried bok choy
Braised chicken wings
Breaded fish fillet
Steamed egg
hong-choo-03


Vegetable balls
Chai poh (preserved radish) omelette
Sweet & sour pork
Curry vegetables
We took the 4 dishes for 3 people option. Costs S$250 nett for 20 days. Add $10 for plastic microwaveable boxes instead of metal containers.

Once in a while, there’s a meal or two that’s not so much to our liking. But overall, we are quite happy to stay with Hong Choo for now. Sometimes, the chicken or pork dishes tend to be a little tough or stringy.

Unlike Kim’s Kitchen which is operated like a large corporation, Hong Choo seems to be smaller in scale. They don’t even have a website. And they also don’t have a pre-planned menu, so you won’t know in advance what you’ll be getting.

I asked them about this before. They replied that it can be difficult to stick to a pre-planned menu as some ingredients may not be available. They prefer to cook using whatever fresh ingredients they can get on the day. As a home cook, I also encounter the same situation, so I can accept this arrangement.

On the whole, this is one of the better tingkat caterers we’ve experienced. Portions are sufficient. Their pricing is very reasonable too. They also seem to provide tingkat lunch.